
Article by Chris Buckham
The question covers three distinct plants: Fig Trees (Ficus carica), kiwi plants (Actinidia deliciosa and Actinidia arguta), and grape vines (vitis vinifera). This article will address each independently.
Fig Trees
The most important thing to remember about figs is that they are very forgiving so do not get too concerned about making mistakes. The basic rules to pruning figs (and other fruit trees are as follows:
- Remove branches that cross,
- Space out branches to allow light and air movement with in the plant,
- Remove suckers, and
- Always cut back to a node or branch (never half way in between).
The basic approach to take when visualizing pruning is to have your plant grow UPWARDS, OUTWARDS and have an OPEN structure. Fig pruning cuts are identified as either a HEADING CUT (shortening a branch but leaving some of it in place) and THIINNING cuts (removing a branch completely back to its base). A Heading cut promotes growth of buds on the remaining branch while a Thinning cut should be used to clear out tangles and helps redirect energy to the remaining stems. Additional detail can be found online regarding fig tree maintenance.
Ref: https://www.foodgardenlife.com/grow-figs-blog/prune-fig-tree
Kiwis
Kiwis are vigorous climbers that may be left to their own devices; however, promotion of fruit will require recurring pruning. Pruning aims to stimulate new fruiting growth each year, sprouting from a permanent framework comprising a main central stem and several pairs of horizontal branches. Fruit is produced on new shoots that sprout from the base of the previous year’s growth so when pruning it’s important to retain the oldest part of last year’s shoots to ensure fruiting. Kiwis should be pruned first when planted and then twice per year (once in winter and summer).
Initial Pruning
- After planting in late winter or spring, before new growth starts, select the strongest shoot and prune it back to 30cm (1ft), cutting just above a healthy bud. Remove the weaker shoots. Tie this main (leading) shoot to a cane attached vertically to the horizontal wires. A cane is a slender, straight, length of woody plant material, usually bamboo. Canes are primarily used as plant supports.
- As the main shoot grows, select a pair of side-shoots and train them in opposite directions along each horizontal wire, tying them to it loosely as they grow. Pinch out the tip of these two horizontal shoots (or arms) when they fill the allotted width
- Allow side-shoots (laterals) to develop at 20–30cm (8–12in) intervals along the horizontal arms. Pinch out the tip of these lateral shoots once they have five leaves
- Continue training a pair of shoots to grow along each horizontal wire, to develop the main permanent framework of espalier tiers.
Winter Pruning
- In late winter or spring, before new growth starts, prune back the existing lateral shoots (coming off the horizontal arms) to three or four buds beyond the last fruited stems.
- Each year, prune back a quarter to a third of the oldest laterals growing from the horizontal arms to a bud about 5cm (2in) from the base. New growth will be produced from this stub in the coming growing season.
Summer Pruning
- Start pruning from June onwards.
- On shoots where fruit has started to form, pinch back to four or five leaves beyond the maturing fruit
- Any non-fruiting laterals can be pruned back to five leaves. Pinch back any regrowth to one leaf beyond the last cut.
Ref: https://www.rhs.org.uk/fruit/kiwi/grow-your-own
Grape Vines
Initial Planting

Your new grape plant will not be pruned; it will have a vigorous root system and a lot of bare shoots rising out of the top. At planting time in spring reduce these numerous shoots to one, and cut it back to three buds (Step 1). After planting, the vine will begin to grow, and push out new green shoots. When these shoots are 8–12″ long, choose the best one and support it by tying to a stake at top and bottom. Look for a strongly growing shoot, upright or nearly so, coming directly out of the old stem (not from the underground root system). Remove the other shoots (Step 2).
Throughout its first summer, continue tying it up the stake to keep it straight and prevent breaking in the wind. This shoot will be your permanent trunk, lasting the whole life of the vine, so it pays to keep it as straight and upright as possible.
1st Dormant Pruning
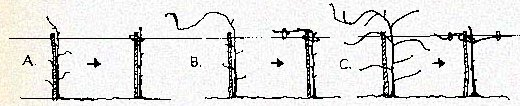
Your first-year vine should have reached to or above the first trellis wire (about 30″) during the previous season’s growth. If it hasn’t, cut it back again to 3 buds, and repeat the previous year’s treatment. This is necessary to establish a sound trunk. If the last year’s shoot just reaches the wire or a few inches beyond, cut it at the first bud above the wire and tie the shoot to the stake and the wire (A). If the shoot is longer, tie it to the stake and wire, cut the vine four or five buds beyond the tie, bend the remaining length of shoot down to the wire and tie (B). Very vigorous shoots may go well above the wire and put out strong side laterals. Choose the two laterals that are closest to the wire, tie to the wire, and prune to 3-5 buds. Tie the main stem to the wire and stake, and cut just above the side laterals (C). During the summer train the new shoots up to the next wire and remove any shoots from lower trunk or root area.
Established Vine Pruning
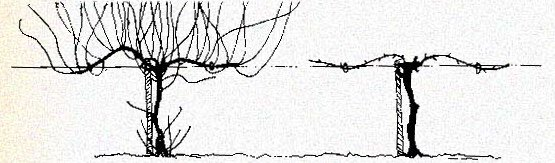
Grapes bear fruit on the green shoots that arise from one-year-old canes. The old canes that produced fruit this season will not produce again. There are several methods used in pruning established grapevines. Cane pruning is the usual system in climates where heat units may not be high and vigorous vines can shade the fruit. In this system a permanent trunk is established, and every year new canes are selected from the head of the vine, where trunk and wire intersect. One or two canes on either side, each 8-10 buds long, are selected and tied to the wire, and all other canes cut out. Choose canes that are about the thickness of your little finger, that come out as close to the head as possible, and that have buds fairly close together. Try to avoid large thick canes with buds spaced far apart. Also leave one or two spur canes, cut to two buds each. They will provide additional canes to select from for the next year’s pruning.
Shoot Thinning and Training
Each grape shoot needs 14 to 16 well exposed leaves to properly ripen a grape cluster. It is important that all the leaves get good sun exposure, because shaded leaves only function at about 6% of their capacity, and may not be contributing at all to ripening the grape cluster.
- Begin thinning shoots as early as possible, in June or as soon as clusters can be seen.
- Shoots are soft and can easily be removed by hand. Space the shoots 3″ to 4″ apart.
- If there is more than one fruit cluster per shoot, the lowest one (closest to the old cane) will usually ripen earliest.
- Unless clusters are very small it’s usually best to thin down to 1 cluster per shoot, especially if there are 3 or 4 clusters.
Training and tying the shoots upward on the trellis wires should also begin fairly early, to maintain spacing and keep the shoots from trailing on the ground or breaking off in the wind. Later in the season, if shoots are long and vigorous, with more than 14 – 16 active leaves, shoots can be topped or cut back on the ends to prevent shading the lower vine. Also, new shoots may emerge where a leaf joins the main shoot. These side shoots should be removed.
Just before harvest, the lower leaves surrounding the grape bunches can be removed to provide better sun exposure. This helps to ripen the grapes and also improves air circulation, which helps to prevent disease infection.
Ref: https://extension.wsu.edu/maritimefruit/grape-research/pruning-grapes-in...